はじめに
mailpitにBASIC認証をつけたい場面があったのでメモ書き。
環境
Docker version 27.1.1, build 6312585
Docker Compose version v2.29.1-desktop.1
BASIC認証はサポートされているのか
- Adding HTTPS | Mailpit
https://mailpit.axllent.org/docs/configuration/http/
上記ページを見ると、BASIC認証の設定方法が記載されているので設定は可能なようだ。
暗号アルゴリズムの参考
- TLS暗号設定ガイドライン
https://www.ipa.go.jp/security/crypto/guideline/gmcbt80000005ufv-att/ipa-cryptrec-gl-3001-3.1.0.pdf
公開鍵,秘密鍵,CSR,証明書の作成
秘密鍵の作成
openssl genrsa -out private.key 2048公開鍵の作成
openssl rsa -in private.key -pubout -out public.keywriting RSA keyが出て、public.keyが出力されていればOK
CSRの作成
openssl req -new -key private.key -out server.csr適当に作成する↓
You are about to be asked to enter information that will be incorporated
into your certificate request.
What you are about to enter is what is called a Distinguished Name or a DN.
There are quite a few fields but you can leave some blank
For some fields there will be a default value,
If you enter '.', the field will be left blank.
-----
Country Name (2 letter code) [AU]:
State or Province Name (full name) [Some-State]:
Locality Name (eg, city) []:
Organization Name (eg, company) [Internet Widgits Pty Ltd]:
Organizational Unit Name (eg, section) []:
Common Name (e.g. server FQDN or YOUR name) []: localhost
Email Address []:

Please enter the following 'extra' attributes
to be sent with your certificate request
A challenge password []:
An optional company name []:
証明書作成
1年で証明書を作成する。
openssl x509 -days 365 -req -sha256 -signkey private.key < server.csr > server.crtCertificate request self-signature ok
subject=C = AU, ST = Some-State, O = Internet Widgits Pty Ltd, CN = localhost構築
最終的なファイルツリーは以下のような想定をする。
├── compose.yml
└── mailpit-data
    ├── authfile
    ├── private.key
    ├── public.key
    ├── server.crt
    └── server.csr
compose.yml
services:
  mailpit:
    image: axllent/mailpit:v1.20.1
    container_name: mailpit
    restart: unless-stopped
    ports:
      - 8025:8025
    volumes:
      - ./mailpit-data:/data
    environment:
      - MP_UI_AUTH_FILE=/data/authfile
      - MP_UI_TLS_CERT=/data/server.crt
      - MP_UI_TLS_KEY=/data/private.key
volumes に 証明書をマウントして /data/に入れておく。
コンテナの立ち上げ
docker compose up -dでコンテナを立ち上げる。
試す
http://localhost:8025 にアクセスをする。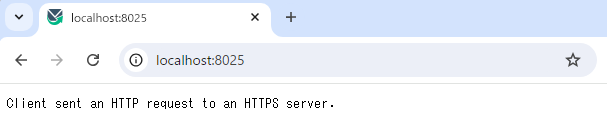
Client sent an HTTP request to an HTTPS server. となり、HTTPでのアクセスは上記の画面になる。
https://localhost:8025 にアクセスをする。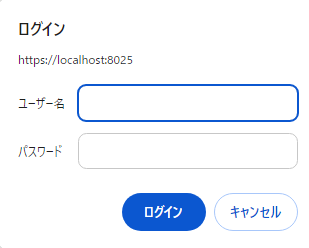 ↓
↓
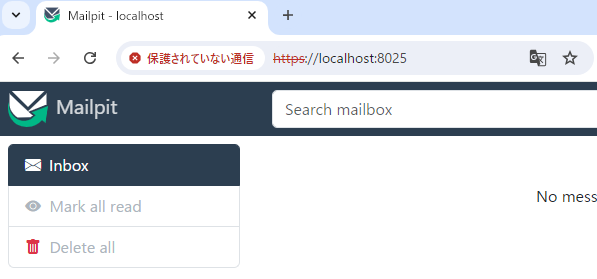
httpsでのアクセスができているのでOK
参考
axllent/mailpit | DockerHub
https://hub.docker.com/r/axllent/mailpitAdding HTTPS | Mailpit
https://mailpit.axllent.org/docs/configuration/http/Apache + OpenSSL CSR生成手順 (新規/更新)
https://knowledge.digicert.com/ja/jp/solution/SO23384OpenSSLでオレオレ証明書を作成
https://qiita.com/gade_seven_539/items/1ad4c78ec0a3502fc120オレオレ証明書作ってみる
https://qiita.com/miyuki_samitani/items/b19aa5ac3b3c6e312bd5
おわりに
BASIC認証はつけたけど、httpのアクセスとなっていたのでhttpsでのアクセスをできるようにした。
mailpitは基本的にローカルで利用するので,公開することはないけど知っておきたいのでやってみた。